发布于 

Docker学习笔记1

Docker 入门

笔记整理来源 B站UP主狂神说Javahttps://space.bilibili.com/95256449/

Docker概述

Docker为什么出现?

一款产品: 开发–上线 两套环境!应用环境,应用配置!

开发 — 运维。 问题:我在我的电脑上可以允许!版本更新,导致服务不可用!对于运维来说考验十分大?

环境配置是十分的麻烦,每一个及其都要部署环境(集群Redis、ES、Hadoop…) !费事费力。

发布一个项目( jar + (Redis MySQL JDK ES) ),项目能不能带上环境安装打包!

之前在服务器配置一个应用的环境 Redis MySQL JDK ES Hadoop 配置超麻烦了,不能够跨平台。

开发环境Windows,最后发布到Linux!

传统:开发jar,运维来做!

现在:开发打包部署上线,一套流程做完!

安卓流程:java — apk —发布(应用商店)一 张三使用apk一安装即可用!

docker流程: java-jar(环境) — 打包项目帯上环境(镜像) — ( Docker仓库:商店)——-

Docker给以上的问题,提出了解决方案!

Docker的思想就来自于集装箱!

JRE – 多个应用(端口冲突) – 原来都是交叉的!
隔离:Docker核心思想!打包装箱!每个箱子是互相隔离的。

Docker通过隔离机制,可以将服务器利用到极致!

本质:所有的技术都是因为出现了一些问题,我们需要去解决,才去学习!

Docker历史

2010年,几个的年轻人,就在美国成立了一家公司 dotcloud

做一些pass的云计算服务!LXC(Linux Container容器)有关的容器技术!

Linux Container容器是一种内核虚拟化技术,可以提供轻量级的虚拟化,以便隔离进程和资源。

他们将自己的技术(容器化技术)命名就是 Docker
Docker刚刚延生的时候,没有引起行业的注意!dotCloud,就活不下去!

开源

2013年,Docker开源!

越来越多的人发现docker的优点!火了。Docker每个月都会更新一个版本!

2014年4月9日,Docker1.0发布!

docker为什么这么火?十分的轻巧!

在容器技术出来之前,我们都是使用虚拟机技术!

虚拟机:在window中装一个VMware,通过这个软件我们可以虚拟出来一台或者多台电脑!笨重!

虚拟机也属于虚拟化技术,Docker容器技术,也是一种虚拟化技术!

1
2
VMware : linux centos 原生镜像(一个电脑!) 隔离、需要开启多个虚拟机! 几个G 几分钟
docker: 隔离,镜像(最核心的环境 4m + jdk + mysql)十分的小巧,运行镜像就可以了!小巧! 几个M 秒级启动!

聊聊Docker

Docker基于Go语言开发的!开源项目!

docker官网:https://www.docker.com/

文档:https://docs.docker.com/ Docker的文档是超级详细的!

仓库:https://hub.docker.com/

ocker能干嘛

之前的虚拟机技术

虚拟机技术缺点

1、 资源占用十分多

2、 冗余步骤多

3、 启动很慢!

容器化技术

容器化技术不是模拟一个完整的操作系统

比较Docker和虚拟机技术的不同:

  • 传统虚拟机,虚拟出一条硬件,运行一个完整的操作系统,然后在这个系统上安装和运行软件
  • 容器内的应用直接运行在宿主机的内容,容器是没有自己的内核的,也没有虚拟我们的硬件,所以就轻便了
  • 每个容器间是互相隔离,每个容器内都有一个属于自己的文件系统,互不影响

DevOps(开发、运维)

应用更快速的交付和部署

传统:一对帮助文档,安装程序。

Docker:打包镜像发布测试一键运行。

更便捷的升级和扩缩容

使用了 Docker之后,我们部署应用就和搭积木一样
项目打包为一个镜像,扩展服务器A!服务器B

更简单的系统运维
在容器化之后,我们的开发,测试环境都是高度一致的

更高效的计算资源利用

Docker是内核级别的虚拟化,可以在一个物理机上可以运行很多的容器实例!服务器的性能可以被压榨到极致。

Docker安装

Docker的基本组成

镜像(image):

docker镜像就好比是一个目标,可以通过这个目标来创建容器服务,tomcat镜像==>run==>容器(提供服务器),通过这个镜像可以创建多个容器(最终服务运行或者项目运行就是在容器中的)。

容器(container):

Docker利用容器技术,独立运行一个或者一组应用,通过镜像来创建的.
启动,停止,删除,基本命令
目前就可以把这个容器理解为就是一个简易的 Linux系统。

仓库(repository):

仓库就是存放镜像的地方!
仓库分为公有仓库和私有仓库。(很类似git)
Docker Hub是国外的。
阿里云…都有容器服务器(配置镜像加速!)

安装Docker

环境准备

1.Linux要求内核3.0以上

2.CentOS 7

1
2
3
4
5
6
7
8
9
10
11
12
13
14
15
16
17
[root@iz2zeak7sgj6i7hrb2g862z ~]# uname -r
3.10.0-514.26.2.el7.x86_64 # 要求3.0以上
[root@iz2zeak7sgj6i7hrb2g862z ~]# cat /etc/os-release
NAME="CentOS Linux"
VERSION="7 (Core)"
ID="centos"
ID_LIKE="rhel fedora"
VERSION_ID="7"
PRETTY_NAME="CentOS Linux 7 (Core)"
ANSI_COLOR="0;31"
CPE_NAME="cpe:/o:centos:centos:7"
HOME_URL="https://www.centos.org/"
BUG_REPORT_URL="https://bugs.centos.org/"
CENTOS_MANTISBT_PROJECT="CentOS-7"
CENTOS_MANTISBT_PROJECT_VERSION="7"
REDHAT_SUPPORT_PRODUCT="centos"
REDHAT_SUPPORT_PRODUCT_VERSION="7"

安装

帮助文档:https://docs.docker.com/engine/install/
卸载与安装

1
2
3
4
5
6
7
8
9
10
11
12
13
14
15
16
17
18
19
20
21
22
23
24
25
26
27
28
29
30
#1.卸载旧版本
yum remove docker \
docker-client \
docker-client-latest \
docker-common \
docker-latest \
docker-latest-logrotate \
docker-logrotate \
docker-engine
#2.需要的安装包
yum install -y yum-utils
#3.设置镜像的仓库
yum-config-manager \
--add-repo \
https://download.docker.com/linux/centos/docker-ce.repo
#上述方法默认是从国外的,不推荐
#推荐使用国内的
yum-config-manager \
--add-repo \
https://mirrors.aliyun.com/docker-ce/linux/centos/docker-ce.repo
#更新yum软件包索引
yum makecache fast
#4.安装docker相关的 docker-ce 社区版 而ee是企业版
yum install docker-ce docker-ce-cli containerd.io # 这里我们使用社区版即可
#5.启动docker
systemctl start docker
#6. 使用docker version查看是否按照成功
docker version
#7. 测试
docker run hello-world
1
2
3
4
#8.查看已经下载的镜像(从这里可以查看已有镜像的id)
[root@iz2zeak7sgj6i7hrb2g862z ~]# docker images
REPOSITORY TAG IMAGE ID CREATED SIZE
hello-world latest bf756fb1ae65 4 months ago 13.3kB

卸载docker

1
2
3
4
5
#1. 卸载依赖
yum remove docker-ce docker-ce-cli containerd.io
#2. 删除资源
rm -rf /var/lib/docker
# /var/lib/docker 是docker的默认工作路径!

阿里云镜像加速

1、登录阿里云找到容器服务

2、找到镜像加速器

3、配置使用

1
2
3
4
5
6
7
8
9
10
11
#1.创建一个目录
sudo mkdir -p /etc/docker
#2.编写配置文件
sudo tee /etc/docker/daemon.json <<-'EOF'
{
"registry-mirrors": ["https://t2wwyxhb.mirror.aliyuncs.com"]
}
EOF
#3.重启服务
sudo systemctl daemon-reload
sudo systemctl restart docker

回顾HelloWorld流程

docker run 流程图

底层原理

Docker是怎么工作的

Docker是一个Client-Server结构的系统,Docker的守护进程运行在主机上。通过Socket从客户端访问!

Docker-Server接收到Docker-Client的指令,就会执行这个命令!

为什么Docker比Vm快
1、docker有着比虚拟机更少的抽象层。由于docker不需要Hypervisor实现硬件资源虚拟化,运行在docker容器上的程序直接使用的都是实际物理机的硬件资源。因此在CPU、内存利用率上docker将会在效率上有明显优势。
2、docker利用的是宿主机的内核,而不需要Guest OS。

1
GuestOS: VM(虚拟机)里的的系统(OS)HostOS:物理机里的系统(OS)

因此,当新建一个 容器时,docker不需要和虚拟机一样重新加载一个操作系统内核。仍而避免引导、加载操作系统内核返个比较费时费资源的过程,当新建一个虚拟机时,虚拟机软件需要加载GuestOS,返个新建过程是分钟级别的。而docker由于直接利用宿主机的操作系统,则省略了这个复杂的过程,因此新建一个docker容器只需要几秒钟

Docker的常用命令

1.帮助命令

1
2
3
docker version    #显示docker的版本信息。
docker info #显示docker的系统信息,包括镜像和容器的数量
docker 命令 --help #帮助命令

帮助文档的地址:https://docs.docker.com/engine/reference/commandline/build/

2.镜像命令

1
2
3
4
docker images #查看所有本地主机上的镜像 可以使用docker image ls代替
docker search #搜索镜像
docker pull #下载镜像 docker image pull
docker rmi #删除镜像 docker image rm
docker images查看所有本地的主机上的镜像
1
2
3
4
5
6
7
8
9
10
11
12
13
14
15
16
17
18
19
20
[root@iz2zeak7sgj6i7hrb2g862z ~]# docker images
REPOSITORY TAG IMAGE ID CREATED SIZE
hello-world latest bf756fb1ae65 4 months ago 13.3kB
mysql 5.7 b84d68d0a7db 6 days ago 448MB
# 解释
#REPOSITORY # 镜像的仓库源
#TAG # 镜像的标签(版本) ---lastest 表示最新版本
#IMAGE ID # 镜像的id
#CREATED # 镜像的创建时间
#SIZE # 镜像的大小
# 可选项
Options:
-a, --all Show all images (default hides intermediate images) #列出所有镜像
-q, --quiet Only show numeric IDs # 只显示镜像的id
[root@iz2zeak7sgj6i7hrb2g862z ~]# docker images -a #列出所有镜像详细信息
[root@iz2zeak7sgj6i7hrb2g862z ~]# docker images -aq #列出所有镜像的id
d5f28a0bb0d0
f19c56ce92a8
1b6b1fe7261e
1b6b1fe7261e
docker search 搜索镜像
1
2
3
4
5
6
7
8
9
10
11
[root@iz2zeak7sgj6i7hrb2g862z ~]# docker search mysql
# --filter=STARS=3000 #过滤,搜索出来的镜像收藏STARS数量大于3000的
Options:
-f, --filter filter Filter output based on conditions provided
--format string Pretty-print search using a Go template
--limit int Max number of search results (default 25)
--no-trunc Don't truncate output
[root@iz2zeak7sgj6i7hrb2g862z ~]# docker search mysql --filter=STARS=3000
NAME DESCRIPTION STARS OFFICIAL AUTOMATED
mysql MySQL IS ... 9520 [OK]
mariadb MariaDB IS ... 3456 [OK]
docker pull 下载镜像
1
2
3
4
5
6
7
8
9
10
11
12
13
14
15
16
17
18
19
# 下载镜像 docker pull 镜像名[:tag]
[root@iz2zeak7sgj6i7hrb2g862z ~]# docker pull tomcat:8
8: Pulling from library/tomcat #如果不写tag,默认就是latest
90fe46dd8199: Already exists #分层下载: docker image 的核心 联合文件系统
35a4f1977689: Already exists
bbc37f14aded: Already exists
74e27dc593d4: Already exists
93a01fbfad7f: Already exists
1478df405869: Pull complete
64f0dd11682b: Pull complete
68ff4e050d11: Pull complete
f576086003cf: Pull complete
3b72593ce10e: Pull complete
Digest: sha256:0c6234e7ec9d10ab32c06423ab829b32e3183ba5bf2620ee66de866df # 签名防伪
Status: Downloaded newer image for tomcat:8
docker.io/library/tomcat:8 #真实地址
#等价于
docker pull tomcat:8
docker pull docker.io/library/tomcat:8
docker rmi 删除镜像
1
2
3
4
docker rmi -f 镜像id #删除指定id的镜像
[root@iz2zeak7sgj6i7hrb2g862z ~]# docker rmi -f f19c56ce92a8
docker rmi -f $(docker images -aq) #删除全部的镜像
[root@iz2zeak7sgj6i7hrb2g862z ~]# docker stop $(docker ps -a -q)

3.容器命令

说明:我们有了镜像才可以创建容器,Linux,下载centos镜像来学习

镜像下载
1
2
#docker中下载centos
docker pull centos
1
2
3
4
5
6
7
docker run 镜像id #新建容器并启动
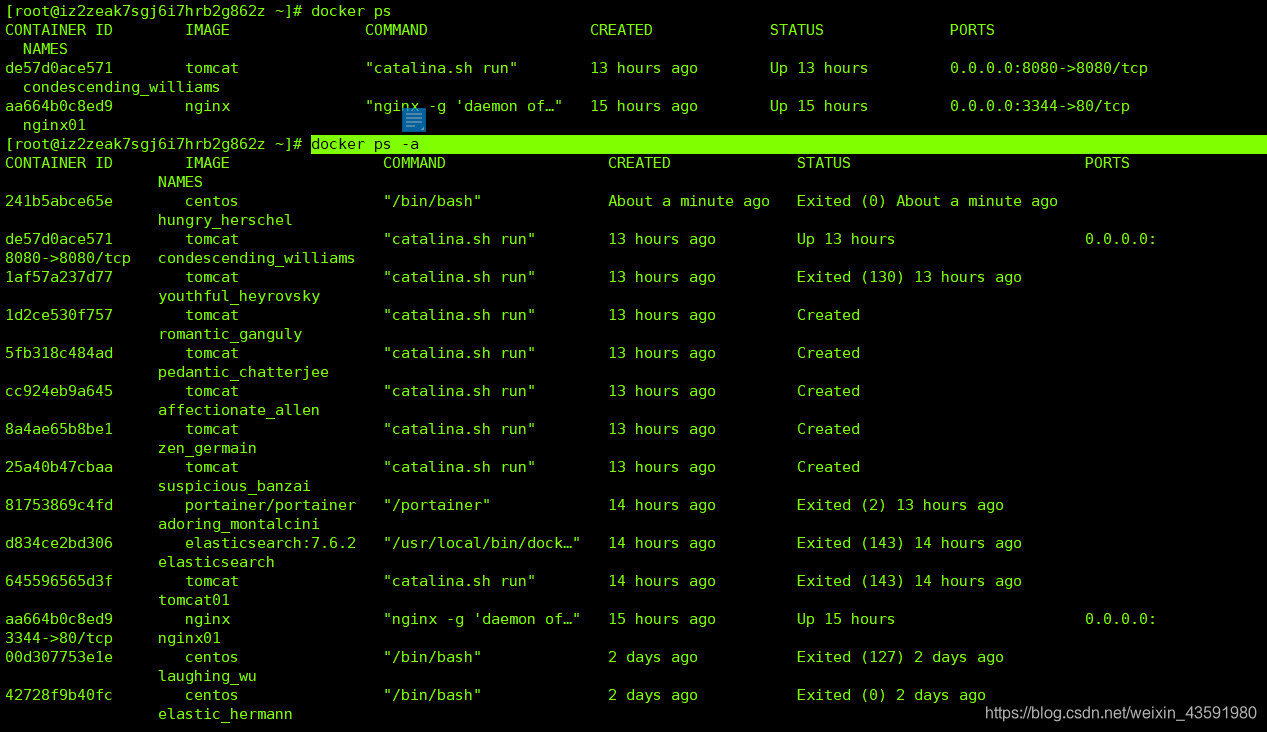
docker ps 列出所有运行的容器 docker container list
docker rm 容器id #删除指定容器
docker start 容器id #启动容器
docker restart 容器id #重启容器
docker stop 容器id #停止当前正在运行的容器
docker kill 容器id #强制停止当前容器
1
[root@iz2zeak7sgj6i7hrb2g862z ~]# docker container list  #h和docker ps相同
新建容器并启动
1
2
3
4
5
6
7
8
9
10
11
12
13
14
15
16
17
18
docker run [可选参数] image | docker container run [可选参数] image 
#参书说明
--name="Name" #容器名字 tomcat01 tomcat02 用来区分容器
-d #后台方式运行
-it #使用交互方式运行,进入容器查看内容
-p #指定容器的端口 -p 8080(宿主机):8080(容器)
-p ip:主机端口:容器端口
-p 主机端口:容器端口(常用)
-p 容器端口
容器端口
-P(大写) 随机指定端口
# 测试、启动并进入容器
[root@iz2zeak7sgj6i7hrb2g
[root@iz2zeak7sgj6i7hrb2g862z ~]# docker run -it centos /bin/bash
[root@241b5abce65e /]# ls
bin dev etc home lib lib64 lost+found media mnt opt proc root run sbin srv sys tmp usr var
[root@241b5abce65e /]# exit #从容器退回主机
exit
列出所有运行的容器
1
2
3
4
docker ps 命令          #列出当前正在运行的容器
-a, --all #列出当前正在运行的容器 + 带出历史运行过的容器
-n=?, --last int #列出最近创建的?个容器 ?为1则只列出最近创建的一个容器,为2则列出2个
-q, --quiet #只列出容器的编号
退出容器
1
2
exit         #容器直接退出
ctrl +P +Q #容器不停止退出 ---注意:这个很有用的操作
删除容器
1
2
3
docker rm 容器id                   #删除指定的容器,不能删除正在运行的容器,如果要强制删除 rm -rf
docker rm -f $(docker ps -aq) #删除所有的容器
docker ps -a -q|xargs docker rm #删除所有的容器
启动和停止容器的操作
1
2
3
4
docker start 容器id    #启动容器
docker restart 容器id #重启容器
docker stop 容器id #停止当前正在运行的容器
docker kill 容器id #强制停止当前容器

4.常用其他命令

后台启动命令
1
2
3
4
5
6
7
8
# 命令 docker run -d 镜像名
[root@iz2zeak7sgj6i7hrb2g862z ~]# docker run -d centos
a8f922c255859622ac45ce3a535b7a0e8253329be4756ed6e32265d2dd2fac6c
[root@iz2zeak7sgj6i7hrb2g862z ~]# docker ps
CONTAINER ID IMAGE COMMAND CREATED STATUS PORTS NAMES
# 问题docker ps. 发现centos 停止了
# 常见的坑,docker容器使用后台运行,就必须要有要一个前台进程,docker发现没有应用,就会自动停止
# nginx,容器启动后,发现自己没有提供服务,就会立刻停止,就是没有程序了
查看日志
1
2
3
4
5
6
7
8
9
10
11
12
13
14
docker logs --help
Options:
--details Show extra details provided to logs
* -f, --follow Follow log output
--since string Show logs since timestamp (e.g. 2013-01-02T13:23:37) or relative (e.g. 42m for 42 minutes)
* --tail string Number of lines to show from the end of the logs (default "all")
* -t, --timestamps Show timestamps
--until string Show logs before a timestamp (e.g. 2013-01-02T13:23:37) or relative (e.g. 42m for 42 minutes)
➜ ~ docker run -d centos /bin/sh -c "while true;do echo 6666;sleep 1;done" #模拟日志
#显示日志
-tf #显示日志信息(一直更新)
--tail number #需要显示日志条数
docker logs -t --tail n 容器id #查看n行日志
docker logs -ft 容器id #跟着日志
查看容器中进程信息ps
1
# 命令 docker top 容器id
查看镜像的元数据
1
2
3
4
5
6
7
8
9
10
11
12
13
14
15
16
17
18
19
20
21
22
23
24
25
26
27
28
29
30
31
32
33
34
35
36
37
38
39
40
41
42
43
44
45
46
47
48
49
50
51
52
53
54
55
56
57
58
59
60
61
62
63
64
65
66
67
68
69
70
71
72
73
74
75
76
77
78
79
80
81
82
83
84
85
86
87
88
89
90
91
92
93
94
95
96
97
98
99
100
101
102
103
104
105
106
107
108
109
110
111
112
113
114
115
116
117
118
119
120
121
122
123
124
125
126
127
128
129
130
131
132
133
134
135
136
137
138
139
140
141
142
143
144
145
146
147
148
149
150
151
152
153
154
155
156
157
158
159
160
161
162
163
164
165
166
167
168
169
170
171
172
173
174
175
176
177
178
179
180
181
182
183
184
185
186
187
188
189
190
191
192
193
194
195
196
197
198
199
200
201
202
203
204
205
206
207
208
209
210
211
212
213
214
215
216
217
218
# 命令
docker inspect 容器id
#测试
➜ ~ docker inspect 55321bcae33d
[
{
"Id": "55321bcae33d15da8280bcac1d2bc1141d213bcc8f8e792edfd832ff61ae5066",
"Created": "2020-05-15T05:22:05.515909071Z",
"Path": "/bin/sh",
"Args": [
"-c",
"while true;do echo 6666;sleep 1;done"
],
"State": {
"Status": "running",
"Running": true,
"Paused": false,
"Restarting": false,
"OOMKilled": false,
"Dead": false,
"Pid": 22973,
"ExitCode": 0,
"Error": "",
"StartedAt": "2020-05-15T05:22:06.165904633Z",
"FinishedAt": "0001-01-01T00:00:00Z"
},
"Image": "sha256:470671670cac686c7cf0081e0b37da2e9f4f768ddc5f6a26102ccd1c6954c1ee",
"ResolvConfPath": "/var/lib/docker/containers/55321bcae33d15da8280bcac1d2bc1141d213bcc8f8e792edfd832ff61ae5066/resolv.conf",
"HostnamePath": "/var/lib/docker/containers/55321bcae33d15da8280bcac1d2bc1141d213bcc8f8e792edfd832ff61ae5066/hostname",
"HostsPath": "/var/lib/docker/containers/55321bcae33d15da8280bcac1d2bc1141d213bcc8f8e792edfd832ff61ae5066/hosts",
"LogPath": "/var/lib/docker/containers/55321bcae33d15da8280bcac1d2bc1141d213bcc8f8e792edfd832ff61ae5066/55321bcae33d15da8280bcac1d2bc1141d213bcc8f8e792edfd832ff61ae5066-json.log",
"Name": "/bold_bell",
"RestartCount": 0,
"Driver": "overlay2",
"Platform": "linux",
"MountLabel": "",
"ProcessLabel": "",
"AppArmorProfile": "docker-default",
"ExecIDs": null,
"HostConfig": {
"Binds": null,
"ContainerIDFile": "",
"LogConfig": {
"Type": "json-file",
"Config": {
}
},
"NetworkMode": "default",
"PortBindings": {
},
"RestartPolicy": {
"Name": "no",
"MaximumRetryCount": 0
},
"AutoRemove": false,
"VolumeDriver": "",
"VolumesFrom": null,
"CapAdd": null,
"CapDrop": null,
"Capabilities": null,
"Dns": [],
"DnsOptions": [],
"DnsSearch": [],
"ExtraHosts": null,
"GroupAdd": null,
"IpcMode": "private",
"Cgroup": "",
"Links": null,
"OomScoreAdj": 0,
"PidMode": "",
"Privileged": false,
"PublishAllPorts": false,
"ReadonlyRootfs": false,
"SecurityOpt": null,
"UTSMode": "",
"UsernsMode": "",
"ShmSize": 67108864,
"Runtime": "runc",
"ConsoleSize": [
0,
0
],
"Isolation": "",
"CpuShares": 0,
"Memory": 0,
"NanoCpus": 0,
"CgroupParent": "",
"BlkioWeight": 0,
"BlkioWeightDevice": [],
"BlkioDeviceReadBps": null,
"BlkioDeviceWriteBps": null,
"BlkioDeviceReadIOps": null,
"BlkioDeviceWriteIOps": null,
"CpuPeriod": 0,
"CpuQuota": 0,
"CpuRealtimePeriod": 0,
"CpuRealtimeRuntime": 0,
"CpusetCpus": "",
"CpusetMems": "",
"Devices": [],
"DeviceCgroupRules": null,
"DeviceRequests": null,
"KernelMemory": 0,
"KernelMemoryTCP": 0,
"MemoryReservation": 0,
"MemorySwap": 0,
"MemorySwappiness": null,
"OomKillDisable": false,
"PidsLimit": null,
"Ulimits": null,
"CpuCount": 0,
"CpuPercent": 0,
"IOMaximumIOps": 0,
"IOMaximumBandwidth": 0,
"MaskedPaths": [
"/proc/asound",
"/proc/acpi",
"/proc/kcore",
"/proc/keys",
"/proc/latency_stats",
"/proc/timer_list",
"/proc/timer_stats",
"/proc/sched_debug",
"/proc/scsi",
"/sys/firmware"
],
"ReadonlyPaths": [
"/proc/bus",
"/proc/fs",
"/proc/irq",
"/proc/sys",
"/proc/sysrq-trigger"
]
},
"GraphDriver": {
"Data": {
"LowerDir": "/var/lib/docker/overlay2/1f347949ba49c4dbee70cea9ff3af39a14e602bc8fac8331c46347bf6708757a-init/diff:/var/lib/docker/overlay2/5afcd8220c51854a847a36f52775b4ed0acb16fe6cfaec3bd2e5df59863835ba/diff",
"MergedDir": "/var/lib/docker/overlay2/1f347949ba49c4dbee70cea9ff3af39a14e602bc8fac8331c46347bf6708757a/merged",
"UpperDir": "/var/lib/docker/overlay2/1f347949ba49c4dbee70cea9ff3af39a14e602bc8fac8331c46347bf6708757a/diff",
"WorkDir": "/var/lib/docker/overlay2/1f347949ba49c4dbee70cea9ff3af39a14e602bc8fac8331c46347bf6708757a/work"
},
"Name": "overlay2"
},
"Mounts": [],
"Config": {
"Hostname": "55321bcae33d",
"Domainname": "",
"User": "",
"AttachStdin": false,
"AttachStdout": false,
"AttachStderr": false,
"Tty": false,
"OpenStdin": false,
"StdinOnce": false,
"Env": [
"PATH=/usr/local/sbin:/usr/local/bin:/usr/sbin:/usr/bin:/sbin:/bin"
],
"Cmd": [
"/bin/sh",
"-c",
"while true;do echo 6666;sleep 1;done"
],
"Image": "centos",
"Volumes": null,
"WorkingDir": "",
"Entrypoint": null,
"OnBuild": null,
"Labels": {
"org.label-schema.build-date": "20200114",
"org.label-schema.license": "GPLv2",
"org.label-schema.name": "CentOS Base Image",
"org.label-schema.schema-version": "1.0",
"org.label-schema.vendor": "CentOS",
"org.opencontainers.image.created": "2020-01-14 00:00:00-08:00",
"org.opencontainers.image.licenses": "GPL-2.0-only",
"org.opencontainers.image.title": "CentOS Base Image",
"org.opencontainers.image.vendor": "CentOS"
}
},
"NetworkSettings": {
"Bridge": "",
"SandboxID": "63ed0c837f35c12453bae9661859f37a08541a0749afb86e881869bf6fd9031b",
"HairpinMode": false,
"LinkLocalIPv6Address": "",
"LinkLocalIPv6PrefixLen": 0,
"Ports": {
},
"SandboxKey": "/var/run/docker/netns/63ed0c837f35",
"SecondaryIPAddresses": null,
"SecondaryIPv6Addresses": null,
"EndpointID": "b129d9a5a2cbb92722a2101244bd81a9e3d8af034e83f338c13790a1a94552a1",
"Gateway": "172.17.0.1",
"GlobalIPv6Address": "",
"GlobalIPv6PrefixLen": 0,
"IPAddress": "172.17.0.4",
"IPPrefixLen": 16,
"IPv6Gateway": "",
"MacAddress": "02:42:ac:11:00:04",
"Networks": {
"bridge": {
"IPAMConfig": null,
"Links": null,
"Aliases": null,
"NetworkID": "ad5ada6a106f5ba3dda9ce4bc1475a4bb593bf5f7fbead72196e66515e8ac36a",
"EndpointID": "b129d9a5a2cbb92722a2101244bd81a9e3d8af034e83f338c13790a1a94552a1",
"Gateway": "172.17.0.1",
"IPAddress": "172.17.0.4",
"IPPrefixLen": 16,
"IPv6Gateway": "",
"GlobalIPv6Address": "",
"GlobalIPv6PrefixLen": 0,
"MacAddress": "02:42:ac:11:00:04",
"DriverOpts": null
}
}
}
}
]
进入当前正在运行的容器

我们通常容器都是使用后台方式运行的,需要进入容器,修改一些配置

命令

docker exec -it 容器id bashshell

#测试
➜ ~ docker ps
CONTAINER ID IMAGE COMMAND CREATED STATUS PORTS NAMES
55321bcae33d centos “/bin/sh -c ‘while t…” 10 minutes ago Up 10 minutes bold_bell
a7215824a4db centos “/bin/sh -c ‘while t…” 13 minutes ago Up 13 minutes zen_kepler
55a31b3f8613 centos “/bin/bash” 15 minutes ago Up 15 minutes lucid_clarke
➜ ~ docker exec -it 55321bcae33d /bin/bash
[root@55321bcae33d /]#

1
2
3
4
5
6
7
8
# 方式二
docker attach 容器id
#测试
docker attach 55321bcae33d
正在执行当前的代码...
区别
#docker exec #进入当前容器后开启一个新的终端,可以在里面操作。(常用)
#docker attach # 进入容器正在执行的终端

从容器内拷贝到主机上

1
2
3
4
5
6
7
8
9
10
11
12
13
14
15
16
17
18
19
20
21
22
docker cp 容器id:容器内路径  主机目的路径
[root@iz2zeak7sgj6i7hrb2g862z ~]# docker ps
CONTAINER ID IMAGE COMMAND CREATED STATUS PORTS NAMES
56a5583b25b4 centos "/bin/bash" 7seconds ago Up 6 seconds
#1. 进入docker容器内部
[root@iz2zeak7sgj6i7hrb2g862z ~]# docker exec -it 56a5583b25b4 /bin/bash
[root@55321bcae33d /]# ls
bin dev etc home lib lib64 lost+found media mnt opt proc root run sbin srv sys tmp usr var
#新建一个文件
[root@55321bcae33d /]# echo "hello" > java.java
[root@55321bcae33d /]# cat hello.java
hello
[root@55321bcae33d /]# exit
exit
#hello.java拷贝到home文件加下
[root@iz2zeak7sgj6i7hrb2g862z /]# docker cp 56a5583b25b4:/hello.java /home
[root@iz2zeak7sgj6i7hrb2g862z /]# cd /home
[root@iz2zeak7sgj6i7hrb2g862z home]# ls -l #可以看见java.java存在
total 8
-rw-r--r-- 1 root root 0 May 19 22:09 haust.java
-rw-r--r-- 1 root root 6 May 22 11:12 java.java
drwx------ 3 www www 4096 May 8 12:14 www

学习方式:将我的所有笔记敲一遍,自己记录笔记!

小结:

命令大全

1
2
3
4
5
6
7
8
9
10
11
12
13
14
15
16
17
18
19
20
21
22
23
24
25
26
27
28
29
30
31
32
33
34
35
36
37
38
39
40
41
attach      Attach local standard input, output, and error streams to a running container
#当前shell下 attach连接指定运行的镜像
build Build an image from a Dockerfile # 通过Dockerfile定制镜像
commit Create a new image from a container's changes #提交当前容器为新的镜像
cp Copy files/folders between a container and the local filesystem #拷贝文件
create Create a new container #创建一个新的容器
diff Inspect changes to files or directories on a container's filesystem #查看docker容器的变化
events Get real time events from the server # 从服务获取容器实时时间
exec Run a command in a running container # 在运行中的容器上运行命令
export Export a container's filesystem as a tar archive #导出容器文件系统作为一个tar归档文件[对应import]
history Show the history of an image # 展示一个镜像形成历史
images List images #列出系统当前的镜像
import Import the contents from a tarball to create a filesystem image #从tar包中导入内容创建一个文件系统镜像
info Display system-wide information # 显示全系统信息
inspect Return low-level information on Docker objects #查看容器详细信息
kill Kill one or more running containers # kill指定docker容器
load Load an image from a tar archive or STDIN #从一个tar包或标准输入中加载一个镜像[对应save]
login Log in to a Docker registry #
logout Log out from a Docker registry
logs Fetch the logs of a container
pause Pause all processes within one or more containers
port List port mappings or a specific mapping for the container
ps List containers
pull Pull an image or a repository from a registry
push Push an image or a repository to a registry
rename Rename a container
restart Restart one or more containers
rm Remove one or more containers
rmi Remove one or more images
run Run a command in a new container
save Save one or more images to a tar archive (streamed to STDOUT by default)
search Search the Docker Hub for images
start Start one or more stopped containers
stats Display a live stream of container(s) resource usage statistics
stop Stop one or more running containers
tag Create a tag TARGET_IMAGE that refers to SOURCE_IMAGE
top Display the running processes of a container
unpause Unpause all processes within one or more containers
update Update configuration of one or more containers
version Show the Docker version information
wait Block until one or more containers stop, then print their exit codes

作业练习

作业一:Docker 安装Nginx

1
2
3
4
5
6
7
8
9
10
11
12
13
14
15
16
17
18
19
20
21
22
23
24
25
26
27
28
29
30
31
#1. 搜索镜像 search 建议大家去docker搜索,可以看到帮助文档
[root@iz2zeak7sgj6i7hrb2g862z ~]# docker search nginx
#2. 拉取下载镜像 pull
[root@iz2zeak7sgj6i7hrb2g862z ~]# docker pull nginx
#3. 查看是否下载成功镜像
[root@iz2zeak7sgj6i7hrb2g862z ~]# docker images
#3. 运行测试
# -d 后台运行
# --name 给容器命名
# -p 宿主机端口:容器内部端口
[root@iz2zeak7sgj6i7hrb2g862z ~]# docker run -d --name nginx01 -p 3344:80 nginx
aa664b0c8ed98f532453ce1c599be823bcc1f3c9209e5078615af416ccb454c2
#4. 查看正在启动的镜像
[root@iz2zeak7sgj6i7hrb2g862z ~]# docker ps
CONTAINER ID IMAGE COMMAND CREATED STATUS PORTS NAMES
75943663c116 nginx "nginx -g 'daemon of…" 41 seconds ago Up 40 seconds 0.0.0.0:82->80/tcp nginx00
#5. 进入容器
[root@iz2zeak7sgj6i7hrb2g862z ~]# docker exec -it nginx01 /bin/bash #进入
root@aa664b0c8ed9:/# whereis nginx #找到nginx位置
nginx: /usr/sbin/nginx /usr/lib/nginx /etc/nginx /usr/share/nginx
root@aa664b0c8ed9:/# cd /etc/nginx/
root@aa664b0c8ed9:/etc/nginx# ls
conf.d fastcgi_params koi-utf koi-win mime.types modules nginx.conf scgi_params uwsgi_params win-utf
#6. 退出容器
root@aa664b0c8ed9:/etc/nginx# exit
exit
#7. 停止容器
[root@iz2zeak7sgj6i7hrb2g862z ~]# docker ps
CONTAINER ID IMAGE COMMAND CREATED STATUS PORTS NAMES
aa664b0c8ed9 nginx "nginx -g 'daemon of…" 10 minutes ago Up 10 minutes 0.0.0.0:3344->80/tcp nginx01
[root@iz2zeak7sgj6i7hrb2g862z ~]# docker stop aa664b0c8ed9

宿主机端口容器内部端口 以及端口暴露:

问题:我们每次改动nginx配置文件,都需要进入容器内部?十分麻烦,我要是可以在容器外部提供一个映射路径,达到在容器外部修改文件名,容器内部就可以自动修改?-v 数据卷 技术!

作业二:用docker 来装一个tomcat

1
2
3
4
5
6
7
8
9
10
11
12
13
14
15
16
17
18
19
20
21
22
23
24
25
26
27
28
29
30
31
32
33
34
35
36
37
38
39
40
41
42
43
44
45
46
47
48
49
50
51
52
53
54
55
# 下载 tomcat9.0
# 之前的启动都是后台,停止了容器,容器还是可以查到, docker run -it --rm 镜像名 一般是用来测试,用完就删除
[root@iz2zeak7sgj6i7hrb2g862z ~]# docker run -it --rm tomcat:9.0
--rm Automatically remove the container when it exits 用完即删
#下载 最新版
[root@iz2zeak7sgj6i7hrb2g862z ~]# docker pull tomcat
#查看下载的镜像
[root@iz2zeak7sgj6i7hrb2g862z ~]# docker images
#以后台方式,暴露端口方式,启动运行
[root@iz2zeak7sgj6i7hrb2g862z ~]# docker run -d -p 8080:8080 --name tomcat01 tomcat
#测试访问有没有问题
curl localhost:8080
#根据容器id进入tomcat容器
[root@iz2zeak7sgj6i7hrb2g862z ~]# docker exec -it 645596565d3f /bin/bash
root@645596565d3f:/usr/local/tomcat#
#查看tomcat容器内部内容:
root@645596565d3f:/usr/local/tomcat# ls -l
total 152
-rw-r--r-- 1 root root 18982 May 5 20:40 BUILDING.txt
-rw-r--r-- 1 root root 5409 May 5 20:40 CONTRIBUTING.md
-rw-r--r-- 1 root root 57092 May 5 20:40 LICENSE
-rw-r--r-- 1 root root 2333 May 5 20:40 NOTICE
-rw-r--r-- 1 root root 3255 May 5 20:40 README.md
-rw-r--r-- 1 root root 6898 May 5 20:40 RELEASE-NOTES
-rw-r--r-- 1 root root 16262 May 5 20:40 RUNNING.txt
drwxr-xr-x 2 root root 4096 May 16 12:05 bin
drwxr-xr-x 1 root root 4096 May 21 11:04 conf
drwxr-xr-x 2 root root 4096 May 16 12:05 lib
drwxrwxrwx 1 root root 4096 May 21 11:04 logs
drwxr-xr-x 2 root root 4096 May 16 12:05 native-jni-lib
drwxrwxrwx 2 root root 4096 May 16 12:05 temp
drwxr-xr-x 2 root root 4096 May 16 12:05 webapps
drwxr-xr-x 7 root root 4096 May 5 20:37 webapps.dist
drwxrwxrwx 2 root root 4096 May 5 20:36 work
root@645596565d3f:/usr/local/tomcat#
#进入webapps目录
root@645596565d3f:/usr/local/tomcat# cd webapps
root@645596565d3f:/usr/local/tomcat/webapps# ls
root@645596565d3f:/usr/local/tomcat/webapps#
# 发现问题:1、linux命令少了。 2.webapps目录为空
# 原因:阿里云镜像的原因,阿里云默认是最小的镜像,所以不必要的都剔除掉
# 保证最小可运行的环境!
# 解决方案:
# 将webapps.dist下的文件都拷贝到webapps下即可
root@645596565d3f:/usr/local/tomcat# ls 找到webapps.dist
BUILDING.txt LICENSE README.md RUNNING.txt conf logs temp webapps.dist
CONTRIBUTING.md NOTICE RELEASE-NOTES bin lib native-jni-lib webapps work
root@645596565d3f:/usr/local/tomcat# cd webapps.dist/ # 进入webapps.dist
root@645596565d3f:/usr/local/tomcat/webapps.dist# ls # 查看内容
ROOT docs examples host-manager manager
root@645596565d3f:/usr/local/tomcat/webapps.dist# cd ..
root@645596565d3f:/usr/local/tomcat# cp -r webapps.dist/* webapps # 拷贝webapps.dist 内容给webapps
root@645596565d3f:/usr/local/tomcat# cd webapps #进入webapps
root@645596565d3f:/usr/local/tomcat/webapps# ls #查看拷贝结果
ROOT docs examples host-manager manager

这样docker部署tomcat就可以访问了

问题:我们以后要部署项目,如果每次都要进入容器是不是十分麻烦?要是可以在容器外部提供一个映射路径,比如webapps,我们在外部放置项目,就自动同步内部就好了!

作业三:部署elasticsearch+kibana

1
2
3
4
5
6
7
8
9
10
11
12
13
14
15
16
17
18
19
20
21
22
23
24
25
26
27
28
29
# es 暴露的端口很多!
# es 十分耗内存
# es 的数据一般需要放置到安全目录!挂载
# --net somenetwork ? 网络配置
# 启动elasticsearch
[root@iz2zeak7sgj6i7hrb2g862z ~]# docker run -d --name elasticsearch -p 9200:9200 -p 9300:9300 -e "discovery.type=single-node" elasticsearch:7.6.2
# 测试一下es是否成功启动
➜ ~ curl localhost:9200
{
"name" : "d73ad2f22dd3",
"cluster_name" : "docker-cluster",
"cluster_uuid" : "atFKgANxS8CzgIyCB8PGxA",
"version" : {
"number" : "7.6.2",
"build_flavor" : "default",
"build_type" : "docker",
"build_hash" : "ef48eb35cf30adf4db14086e8aabd07ef6fb113f",
"build_date" : "2020-03-26T06:34:37.794943Z",
"build_snapshot" : false,
"lucene_version" : "8.4.0",
"minimum_wire_compatibility_version" : "6.8.0",
"minimum_index_compatibility_version" : "6.0.0-beta1"
},
"tagline" : "You Know, for Search"
}
#测试成功就关掉elasticSearch,防止耗内存
[root@iz2zeak7sgj6i7hrb2g862z ~]# docker stop d834ce2bd306
d834ce2bd306
[root@iz2zeak7sgj6i7hrb2g862z ~]# docker stats # 查看docker容器使用内存情况
1
2
3
#测试成功就关掉elasticSearch,可以添加内存的限制,修改配置文件 -e 环境配置修改
➜ ~ docker rm -f d73ad2f22dd3 # stop命令也行
➜ ~ docker run -d --name elasticsearch -p 9200:9200 -p 9300:9300 -e "discovery.type=single-node" -e ES_JAVA_OPTS="-Xms64m -Xmx512m" elasticsearch:7.6.2
1
2
3
4
5
6
7
8
9
10
11
12
13
14
15
16
17
18
➜  ~ curl localhost:9200
{
"name" : "b72c9847ec48",
"cluster_name" : "docker-cluster",
"cluster_uuid" : "yNAK0EORSvq3Wtaqe2QqAg",
"version" : {
"number" : "7.6.2",
"build_flavor" : "default",
"build_type" : "docker",
"build_hash" : "ef48eb35cf30adf4db14086e8aabd07ef6fb113f",
"build_date" : "2020-03-26T06:34:37.794943Z",
"build_snapshot" : false,
"lucene_version" : "8.4.0",
"minimum_wire_compatibility_version" : "6.8.0",
"minimum_index_compatibility_version" : "6.0.0-beta1"
},
"tagline" : "You Know, for Search"
}

作业三:使用kibana连接es (elasticSearch)?思考网络如何才能连接

Portainer 可视化面板安装

  • portainer(先用这个)
1
2
docker run -d -p 8080:9000 \
--restart=always -v /var/run/docker.sock:/var/run/docker.sock --privileged=true portainer/portainer
  • Rancher(CI/CD再用)
    什么是portainer?

Docker图形化界面管理工具!提供一个后台面板供我们操作!

1
2
3
4
5
6
7
8
9
10
# 安装命令
[root@iz2zeak7sgj6i7hrb2g862z ~]# docker run -d -p 8080:9000 \
> --restart=always -v /var/run/docker.sock:/var/run/docker.sock --privileged=true portainer/portainer
Unable to find image 'portainer/portainer:latest' locally
latest: Pulling from portainer/portainer
d1e017099d17: Pull complete
a7dca5b5a9e8: Pull complete
Digest: sha256:4ae7f14330b56ffc8728e63d355bc4bc7381417fa45ba0597e5dd32682901080
Status: Downloaded newer image for portainer/portainer:latest
81753869c4fd438cec0e31659cbed0d112ad22bbcfcb9605483b126ee8ff306d

测试访问: 外网:8080 :http://123.56.247.59:8080/

进入之后的面板

镜像原理之联合文件系统

镜像是什么

镜像是一种轻量级、可执行的独立软件保,用来打包软件运行环境和基于运行环境开发的软件,他包含运行某个软件所需的所有内容,包括代码、运行时库、环境变量和配置文件。

所有应用,直接打包docker镜像,就可以直接跑起来!

如何得到镜像

  • 从远程仓库下载
  • 别人拷贝给你
  • 自己制作一个镜像 DockerFile

Docker镜像加载原理

UnionFs (联合文件系统)

UnionFs(联合文件系统):Union文件系统(UnionFs)是一种分层、轻量级并且高性能的文件系统,他支持对文件系统的修改作为一次提交来一层层的叠加,同时可以将不同目录挂载到同一个虚拟文件系统下( unite several directories into a single virtual filesystem)。Union文件系统是 Docker镜像的基础。镜像可以通过分层来进行继承,基于基础镜像(没有父镜像),可以制作各种具体的应用镜像
特性:一次同时加载多个文件系统,但从外面看起来,只能看到一个文件系统,联合加载会把各层文件系统叠加起来,这样最终的文件系统会包含所有底层的文件和目录。

Docker镜像加载原理

docker的镜像实际上由一层一层的文件系统组成,这种层级的文件系统UnionFS。
boots(boot file system)主要包含 bootloader和 Kernel, bootloader主要是引导加 kernel, Linux刚启动时会加bootfs文件系统,在 Docker镜像的最底层是 boots。这一层与我们典型的Linux/Unix系统是一样的,包含boot加載器和内核。当boot加载完成之后整个内核就都在内存中了,此时内存的使用权已由 bootfs转交给内核,此时系统也会卸载bootfs。
rootfs(root file system),在 bootfs之上。包含的就是典型 Linux系统中的/dev,/proc,/bin,/etc等标准目录和文件。 rootfs就是各种不同的操作系统发行版,比如 Ubuntu, Centos等等。

平时我们安装进虚拟机的CentOS都是好几个G,为什么Docker这里才200M?

对于个精简的OS,rootfs可以很小,只需要包合最基本的命令,工具和程序库就可以了,因为底层直接用Host的kernel,自己只需要提供rootfs就可以了。由此可见对于不同的Linux发行版, boots基本是一致的, rootfs会有差別,因此不同的发行版可以公用bootfs.

虚拟机是分钟级别,容器是秒级!

分层理解

分层的镜像

我们可以去下载一个镜像,注意观察下载的日志输出,可以看到是一层层的在下载

思考:为什么Docker镜像要采用这种分层的结构呢?

最大的好处,我觉得莫过于资源共享了!比如有多个镜像都从相同的Base镜像构建而来,那么宿主机只需在磁盘上保留一份base镜像,同时内存中也只需要加载一份base镜像,这样就可以为所有的容器服务了,而且镜像的每一层都可以被共享。

查看镜像分层的方式可以通过docker image inspect 命令

1
2
3
4
5
6
7
8
9
10
11
12
13
14
15
16
17
18
19
20
21
22
23
24
25
26
27
28
29
30
31
32
33
34
35
36
37
38
39
40
41
42
43
44
45
46
47
48
49
50
51
52
53
54
55
56
57
58
59
60
61
62
63
64
65
66
67
68
69
70
71
72
73
74
75
76
77
78
79
80
81
82
83
84
85
86
87
88
89
90
91
92
93
94
95
96
97
98
99
100
101
102
103
104
105
106
107
108
109
110
111
112
113
114
115
116
117
118
119
120
121
122
123
➜  / docker image inspect redis          
[
{
"Id": "sha256:f9b9909726890b00d2098081642edf32e5211b7ab53563929a47f250bcdc1d7c",
"RepoTags": [
"redis:latest"
],
"RepoDigests": [
"redis@sha256:399a9b17b8522e24fbe2fd3b42474d4bb668d3994153c4b5d38c3dafd5903e32"
],
"Parent": "",
"Comment": "",
"Created": "2020-05-02T01:40:19.112130797Z",
"Container": "d30c0bcea88561bc5139821227d2199bb027eeba9083f90c701891b4affce3bc",
"ContainerConfig": {
"Hostname": "d30c0bcea885",
"Domainname": "",
"User": "",
"AttachStdin": false,
"AttachStdout": false,
"AttachStderr": false,
"ExposedPorts": {
"6379/tcp": {
}
},
"Tty": false,
"OpenStdin": false,
"StdinOnce": false,
"Env": [
"PATH=/usr/local/sbin:/usr/local/bin:/usr/sbin:/usr/bin:/sbin:/bin",
"GOSU_VERSION=1.12",
"REDIS_VERSION=6.0.1",
"REDIS_DOWNLOAD_URL=http://download.redis.io/releases/redis-6.0.1.tar.gz",
"REDIS_DOWNLOAD_SHA=b8756e430479edc162ba9c44dc89ac394316cd482f2dc6b91bcd5fe12593f273"
],
"Cmd": [
"/bin/sh",
"-c",
"#(nop) ",
"CMD [\"redis-server\"]"
],
"ArgsEscaped": true,
"Image": "sha256:704c602fa36f41a6d2d08e49bd2319ccd6915418f545c838416318b3c29811e0",
"Volumes": {
"/data": {
}
},
"WorkingDir": "/data",
"Entrypoint": [
"docker-entrypoint.sh"
],
"OnBuild": null,
"Labels": {
}
},
"DockerVersion": "18.09.7",
"Author": "",
"Config": {
"Hostname": "",
"Domainname": "",
"User": "",
"AttachStdin": false,
"AttachStdout": false,
"AttachStderr": false,
"ExposedPorts": {
"6379/tcp": {
}
},
"Tty": false,
"OpenStdin": false,
"StdinOnce": false,
"Env": [
"PATH=/usr/local/sbin:/usr/local/bin:/usr/sbin:/usr/bin:/sbin:/bin",
"GOSU_VERSION=1.12",
"REDIS_VERSION=6.0.1",
"REDIS_DOWNLOAD_URL=http://download.redis.io/releases/redis-6.0.1.tar.gz",
"REDIS_DOWNLOAD_SHA=b8756e430479edc162ba9c44dc89ac394316cd482f2dc6b91bcd5fe12593f273"
],
"Cmd": [
"redis-server"
],
"ArgsEscaped": true,
"Image": "sha256:704c602fa36f41a6d2d08e49bd2319ccd6915418f545c838416318b3c29811e0",
"Volumes": {
"/data": {
}
},
"WorkingDir": "/data",
"Entrypoint": [
"docker-entrypoint.sh"
],
"OnBuild": null,
"Labels": null
},
"Architecture": "amd64",
"Os": "linux",
"Size": 104101893,
"VirtualSize": 104101893,
"GraphDriver": {
"Data": {
"LowerDir": "/var/lib/docker/overlay2/adea96bbe6518657dc2d4c6331a807eea70567144abda686588ef6c3bb0d778a/diff:/var/lib/docker/overlay2/66abd822d34dc6446e6bebe73721dfd1dc497c2c8063c43ffb8cf8140e2caeb6/diff:/var/lib/docker/overlay2/d19d24fb6a24801c5fa639c1d979d19f3f17196b3c6dde96d3b69cd2ad07ba8a/diff:/var/lib/docker/overlay2/a1e95aae5e09ca6df4f71b542c86c677b884f5280c1d3e3a1111b13644b221f9/diff:/var/lib/docker/overlay2/cd90f7a9cd0227c1db29ea992e889e4e6af057d9ab2835dd18a67a019c18bab4/diff",
"MergedDir": "/var/lib/docker/overlay2/afa1de233453b60686a3847854624ef191d7bc317fb01e015b4f06671139fb11/merged",
"UpperDir": "/var/lib/docker/overlay2/afa1de233453b60686a3847854624ef191d7bc317fb01e015b4f06671139fb11/diff",
"WorkDir": "/var/lib/docker/overlay2/afa1de233453b60686a3847854624ef191d7bc317fb01e015b4f06671139fb11/work"
},
"Name": "overlay2"
},
"RootFS": {
"Type": "layers",
"Layers": [
"sha256:c2adabaecedbda0af72b153c6499a0555f3a769d52370469d8f6bd6328af9b13",
"sha256:744315296a49be711c312dfa1b3a80516116f78c437367ff0bc678da1123e990",
"sha256:379ef5d5cb402a5538413d7285b21aa58a560882d15f1f553f7868dc4b66afa8",
"sha256:d00fd460effb7b066760f97447c071492d471c5176d05b8af1751806a1f905f8",
"sha256:4d0c196331523cfed7bf5bafd616ecb3855256838d850b6f3d5fba911f6c4123",
"sha256:98b4a6242af2536383425ba2d6de033a510e049d9ca07ff501b95052da76e894"
]
},
"Metadata": {
"LastTagTime": "0001-01-01T00:00:00Z"
}
}
]

理解:

所有的 Docker镜像都起始于一个基础镜像层,当进行修改或培加新的内容时,就会在当前镜像层之上,创建新的镜像层。

举一个简单的例子,假如基于 Ubuntu Linux16.04创建一个新的镜像,这就是新镜像的第一层;如果在该镜像中添加 Python包,
就会在基础镜像层之上创建第二个镜像层;如果继续添加一个安全补丁,就会创健第三个镜像层该像当前已经包含3个镜像层,如下图所示(这只是一个用于演示的很简单的例子)。

在添加额外的镜像层的同时,镜像始终保持是当前所有镜像的组合,理解这一点.

在添加额外的镜像层的同时,镜像始终保持是当前所有镜像的组合,理解这一点非常重要。下图中举了一个简单的例子,每个镜像层包含3个文件,而镜像包含了来自两个镜像层的6个文件。

上图中的镜像层跟之前图中的略有区別,主要目的是便于展示文件
下图中展示了一个稍微复杂的三层镜像,在外部看来整个镜像只有6个文件,这是因为最上层中的文件7是文件5的一个更新版。

文种情況下,上层镜像层中的文件覆盖了底层镜像层中的文件。这样就使得文件的更新版本作为一个新镜像层添加到镜像当中

Docker通过存储引擎(新版本采用快照机制)的方式来实现镜像层堆栈,并保证多镜像层对外展示为统一的文件系统

Linux上可用的存储引撃有AUFS、 Overlay2、 Device Mapper、Btrfs以及ZFS。顾名思义,每种存储引擎都基于 Linux中对应的
件系统或者块设备技术,井且每种存储引擎都有其独有的性能特点。

Docker在 Windows上仅支持 windowsfilter 一种存储引擎,该引擎基于NTFS文件系统之上实现了分层和CoW [1]。

下图展示了与系统显示相同的三层镜像。所有镜像层堆并合井,对外提供统一的视图。

特点

Docker 镜像都是只读的,当容器启动时,一个新的可写层加载到镜像的顶部!

这一层就是我们通常说的容器层,容器之下的都叫镜像层!

commit镜像

1
2
3
docker commit 提交容器成为一个新的副本
# 命令和git原理类似
docker commit -m="描述信息" -a="作者" 容器id 目标镜像名:[版本TAG]

实战测试

1
2
3
4
5
6
7
8
9
10
11
12
13
14
15
16
17
18
19
20
21
22
23
24
25
26
27
# 1、启动一个默认的tomcat
[root@iz2zeak7sgj6i7hrb2g862z ~]# docker run -d -p 8080:8080 tomcat
de57d0ace5716d27d0e3a7341503d07ed4695ffc266aef78e0a855b270c4064e
# 2、发现这个默认的tomcat 是没有webapps应用,官方的镜像默认webapps下面是没有文件的!
#docker exec -it 容器id /bin/bash
[root@iz2zeak7sgj6i7hrb2g862z ~]# docker exec -it de57d0ace571 /bin/bash
root@de57d0ace571:/usr/local/tomcat#
# 3、从webapps.dist拷贝文件进去webapp
root@de57d0ace571:/usr/local/tomcat# cp -r webapps.dist/* webapps
root@de57d0ace571:/usr/local/tomcat# cd webapps
root@de57d0ace571:/usr/local/tomcat/webapps# ls
ROOT docs examples host-manager manager
# 4、将操作过的容器通过commit**为一个镜像!我们以后就使用我们修改过的镜像即可,而不需要每次都重新拷贝webapps.dist下的文件到webapps了,这就是我们自己的一个修改的镜像。
docker commit -m="描述信息" -a="作者" 容器id 目标镜像名:[TAG]
docker commit -a="kuangshen" -m="add webapps app" 容器id tomcat02:1.0
[root@iz2zeak7sgj6i7hrb2g862z ~]# docker commit -a="csp提交的" -m="add webapps app" de57d0ace571 tomcat02.1.0
sha256:d5f28a0bb0d0b6522fdcb56f100d11298377b2b7c51b9a9e621379b01cf1487e
[root@iz2zeak7sgj6i7hrb2g862z ~]# docker images
REPOSITORY TAG IMAGE ID CREATED SIZE
tomcat02.1.0 latest d5f28a0bb0d0 14 seconds ago 652MB
tomcat latest 1b6b1fe7261e 5 days ago 647MB
nginx latest 9beeba249f3e 5 days ago 127MB
mysql 5.7 b84d68d0a7db 5 days ago 448MB
elasticsearch 7.6.2 f29a1ee41030 8 weeks ago 791MB
portainer/portainer latest 2869fc110bf7 2 months ago 78.6MB
centos latest 470671670cac 4 months ago 237MB
hello-world latest bf756fb1ae65 4 months ago 13.3kB

如果你想要保存当前容器的状态,就可以通过commit来提交,获得一个镜像,就好比我们我们使用虚拟机的快照。

入门成功!!!!